Friday, December 6, 2013

Juki HZL-F600 and Juki TL-2010Q Sewing Machine Reviews

I get countless emails asking me about whatever happened to Vera (my awful Husqvarna Viking Sapphire 835 sewing machine). Today I would like to address what has happened since I posted about Vera and which machines I ended up with. This will be a long, but hopefully informative, post.

To read the initial letter sent to Husqvarna Viking regarding the machine, click here.

To read the response to the letter sent to Husqvarna Viking, click here.

In the response post, you will read that I purchased a Juki TL-2010Q. Originally, I wasn't going to post a full review of this machine since so many other bloggers have already done the same. But, now that I have answered questions from dozens of other sewists out there looking for a decent sewing machine, I decided to go ahead and post about it here.

Monster - Juki TL-2010Q

Juki TL-2010Q

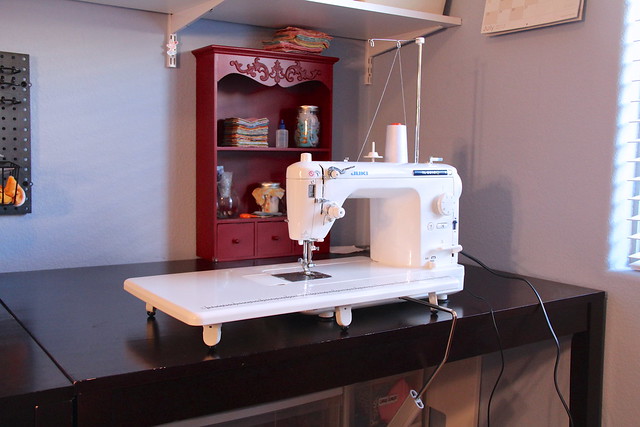
I purchased my Juki TL-2010Q (who has not been officially named yet, but has been lovingly referred to as "Monster" in my house) the first week of January 2013. Initially I had a few problems with the tension, not because there was anything wrong with the machine, but because setting the tension on the Monster is much different than setting the tension had been with Vera. As always, I keep my manual close at hand when sewing and referred to it often in those early days. My friends Cristy (Purple Daisies LLC and Sew Much Like Mom) and Alyssa (Pile O' Fabric) both have this machine and helped me understand how it works. If I ever had an issue, I called one of them. Isn't it nice to have such knowledgeable friends?! Honestly, I didn't have many issues then and still haven't encountered many almost a year later. This machine is just great.

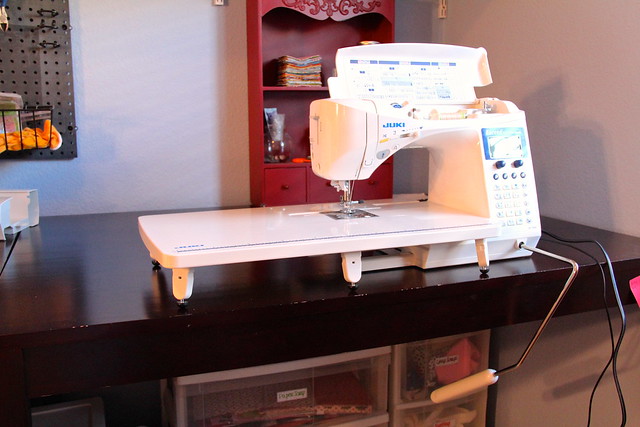
The 2010Q is a true workhorse. The solid metal frame and casing means this machine has top notch parts not susceptible to heat or friction related warping. The straight stitch only design keeps the needle stationary, avoiding any needle placement/timing related issues. I really love that it is built to hold cones of thread rather than just tiny spools that feed sideways through the machine. And if you need to use a thread that may be more slippery than a traditional poly or cotton, the 2010Q manual draws out how to feed the thread through the thread intake to decrease the chances of the machine coming unthreaded.

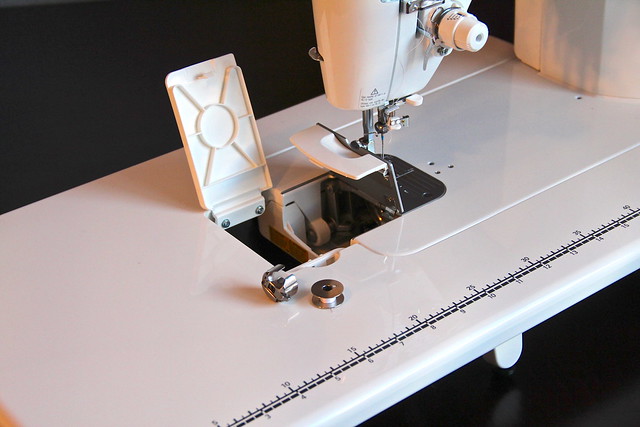
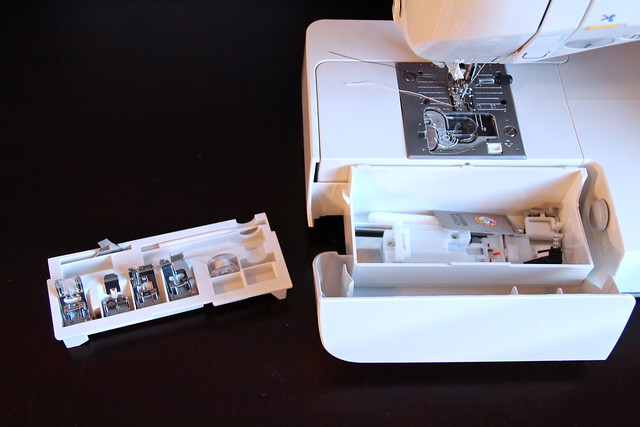
There aren't as many bells and whistles on this machine as there are on some others, but the features that come with this machine are the best. There is an easy-to-use speed control lever ranging from tortoise to hare located on the front of the machine, making it convenient to change the speed of stitching mid-project. There is a large reverse lever for quick back-stitches as well as a knee-lift for quick turns. The machine has a needle threader which threads from the side, not unlike a long arm machine (did I mention this can be a mid-arm when placed on a frame?) taking the stress and anxiety off of having to re-thread a minuscule needle eye. The automatic cutter can be used by either pressing a button on the front of the machine, or kicking the heel of the foot pedal. Also, the thread cutter draws both threads to the back of your work, super handy when you don't want threads on the front. If you're lazy and don't like to pull the bobbin thread up before starting to stitch again, you can begin stitching immediately after using the cut function. Just know sometimes the needle will come unthreaded when you sew this way. The table this machine comes with is large and accommodating for piecing and quilting. And even though the bobbin is placed underneath the machine, the table offers a trap door making changing the bobbin with the table on the machine a breeze.
Juki TL-2010Q

This machine came with a walking foot. The first time I used the walking foot, I loosely quilted a queen size flannel quilt. The foot clicked and clacked and really just made it clear that it wasn't going to do a great job on the quilting. I managed to press through, quilting the entire quilt with the same foot. The quilt turned out fine; no tucks, tension issues or skipped stitches, but still the foot had been SO LOUD. I contacted the store I bought the machine from.

The store employees had not heard of the problems I was (or perceived) having with this particular walking foot, but ever the customer service based company, they replaced the walking foot, free of charge. A few months later, I used the new walking foot to quilt another straight line quilt, this one for someone's wedding day. I wanted it to come out perfectly, and it did, but not without more clicking, more clacking, and more paranoia from me. I called the store back to discuss the foot, only to find that the particular foot I had was very expensive, more than $100 on average. They, as well as I, were flabbergasted. Surely I was doing something wrong. If I'm being completely honest, I don't straight line quilt on this machine very often, or at all. I really like FMQing so I typically do that when finishing a quilt. Cristy lent me a couple other walking feet to try on the machine, but since I don't make many things that require a walking foot, I haven't had the chance to use them yet. I called another local Juki dealer to ask about the foot, and they were as puzzled as I was. They said I should make sure my foot pressure is high while using my walking foot. I don't remember what I had the pressure set to when I quilted these quilts. SO, this is my way of saying the walking foot that comes with the machine is supposed to be good (and costly) but I haven't had great luck with it. I need to tweak my technique before I can give an accurate review of this particular foot. But, since you don't need a walking foot for quilting, I'm not sure how detrimental this will be. Maybe if I were a bag maker, a shoddy walking foot would be a bigger problem.

Juki TL-2010Q

Juki TL-2010Q

The machine is sturdy, never scooting around my tabletop even when I have the pedal-to-the-metal on full "hare" speed. It's a great machine. Amazing. Fantastic. I would recommend this machine to anybody. AND I HAVE!

So then I was left with an amazing straight-stitch machine and Vera. Freaking awful Vera. I thought it would be okay to keep the Viking around for those times I needed specialty stitches, like zig zag or button hole, but she couldn't even handle those. At best, Vera had become a giant dust collector in my craft room.

Big Butt Hazel - Juki HZL-F600

Juki HZL-F600

Fast forward to May 2013. I still had not been able to create a consistent stitch with Vera. I had, however, still been able to churn out some impressive amounts of commission projects and quilts, buffering my craft budget enough that I could buy a new machine. I hemmed and hawed for a while, claiming I was completely satisfied only owning a giant, Vera-shaped doorstop and an amazing Juki TL-2010Q. But my husband heard me from my craft room. He heard the screaming, the frustration, the hate-filled words that spewed from my mouth and onto Vera's stupid, plastic face. He couldn't stand it any longer and so, set up a babysitter so we could go machine shopping.

I did some research online before venturing out into the claws of sewing machine salesmen. I knew the features I was looking for. The price I was willing to pay. I came prepared with a giant bag full of projects and no time limit. (I am a salesman's worst nightmare, I assure you.) I tried out many machines from many manufacturers. I stitched and quilted for HOURS, taking the time to work on some projects and giving each machine a real workout to determine how well it would hold up under pressure. Eventually, I found myself coming back to a Janome my friend had recommended to me. It fit my price point and had a stellar recommendation, but it still didn't quite feel right. I made up my mind to leave the shop and sleep on it for a few days.

Then, realizing they may lose a sale and grasping at straws, the saleswoman asked me how I felt about Juki.

Juki? I LOVE my Juki.

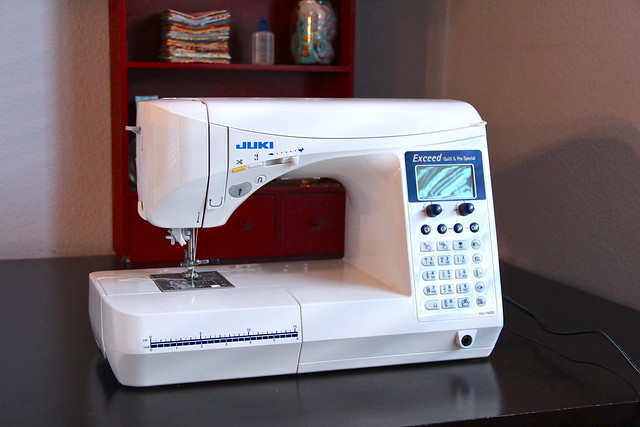
After all shock had worn off that I had even heard of Juki and a 10 minute vacation to the back room, she emerged with the Juki HZL-F600. Having never heard of this machine, I was hesitant, but wanted to give it a fair try, especially considering the company had earned my respect by making such an amazing 2010Q. As I pulled out another project, my husband began frantically bashing his fingers into his iPhone screen, searching for any and all reviews he could find on the machine. Turns out, there weren't very many out there, giving him pause over whether we should even consider this machine. After all, we couldn't find reviews for Vera either and look how that turned out.

Juki HZL-F600

Sitting there in that tiny machine shop, sitting on the too small chair and stitching in a too small area, I fell in love. Fell in love with the fact that the same great features I adored in my 2010Q had been transferred to this computerized machine; the knee-lift, the table, the cutter, the speed control. I fell in love with the sound it made as it whirred through button-holes and zigzag stitches, the sound it made when it performed the basic functions it was meant to perform. I fell in love with the storage it offered, both on the machine and on the case. It was sturdy and it never faltered once during my hour or two sewing session. I knew this was the machine I wanted.

Juki HZL-F600

The local shop I purchased from is fantastic. They are interested in pleasing their customers and worked with me on the price. My husband had found the machine online for a much lower price than they were asking, but I like to support my local economy and so asked the owner of the shop if he would match the price. I would pay cash. Satisfied with that deal, he asked for $50 more than the online price, which I wasn't going to argue. I also discussed with him my dilemma with Vera:

I had the machine and all the parts but it was a terrible machine. I didn't feel right selling it to someone on Craigslist or eBay. I couldn't, in good conscience, sell that awful machine to someone who thought they were getting a smoking deal. I just couldn't. I wouldn't. But trading into a machine shop toward a new machine would both give me a small return for my troubles through the years and still keep me away from any moral dilemma. If they chose to fix and resell the machine, at least they could offer customer support. Or they could scrap her for parts. I didn't care.

The owner offered me a more than fair amount for trade-in on Vera, saving me from that monstrosity once and for all. I cannot even tell you the relief I felt when I handed her over to the saleswoman! I was finally free! After a quick ride to the bank, I came back to find a brand new (not even the one they opened for me to play with) Juki HZL-F600 sitting, waiting for me. Again, I love this shop.

I have had the machine about seven months now with no problems. She sews brilliantly. Her name, Big Butt Hazel, comes from the fact that she has a very wide base, mostly due to her computer. I mostly just call her Hazel though. No need to cause a complexion!

I bounce back and forth between these two machines, sewing about 20 hours each week on each of them. They perform different tasks for me and both are staples in my craft room. Hazel usually accompanies me to guild meetings and sewing play dates since she's lighter than the 2010Q, while the 2010Q is my sole quilting machine. Hazel actually has some great quilting capabilities too, but I choose not to use them. Hazel is used for all alterations. She has a tiny free-arm. The 2010Q is used for most of my piecing.

Hazel is a self-lubricating machine (as are most computerized machines). I make sure to run her at least once per week to keep all her joints moving smoothly. The Monster 2010Q gets oiled about once per month (as needed). The manual includes detailed directions on how to oil the machine (made even easier by holes in the casing specially designed for oil) and also includes your first bottle of machine oil. Right now, I keep the hard case on Hazel when she's not in use, but I don't use the soft case that came with the 2010Q. I keep meaning to make a sewing machine cover for him, but it just hasn't happened yet. It's on my to-do list, I guess.

So there you have it: my reviews of my sewing machines. If you have any questions regarding these machines, please do not hesitate to ask. I would love to share my knowledge so everyone can make a more educated decision when purchasing their sewing machines.

The last bit of advice I will leave you: a sewing machine is an investment. Save up until you can afford the machine you really want. Don't settle for the machine that might work for now.

Danny

Thursday, November 28, 2013

Wednesday, November 27, 2013

New Skill Builder BOM from Alyssa at Pile O' Fabric

I have some very exciting news: Pile O' Fabric's new Skill Builder BOM is live!

Most BOMs and skill builders leave you with some new technique/skill, but also with a stack of blocks that don't match and just scream "SAMPLER" when pieced together into a quilt top. Alyssa's Skill Builder BOM is different, offering not only great techniques you may never have heard of before, but also a cohesive design any sewist can be proud of creating; not like some other sampler quilts which end up lining dog beds or being used for outdoor-only activities. Oh wait, is that just me?? Right... moving on then.

This Skill Builder BOM is also quilt as you go (QAYG). Alyssa will teach FMQ each month along with the block construction taking much of the stress out of FMQing. I personally LOVE FMQ and am looking forward to honing my skills and learning new designs. Plus, it's so much easier to FMQ on small blocks than it is to tackle large quilts on your domestic machine.


I'm a realist. I know my time is precious and between Stash Bee and PHXMQG Vitamin D Bee and actually wanting to do some sewing myself and being a mother and wife, it's difficult to take on anything new. This, however, is one program I am going to make time for. I love to learn, especially when it comes to my craft. I spend so much time quilting, it's only natural for me to want to master existing skills and learn to stretch myself, creatively. I hope you will join me. I chose not to participate last year and feel I missed out on something great, not just the skills, but the community that comes with sewing alongside other creators.

I have already joined and tried out the new Pile O' Fabric Sewing Room interface. The Sewing Room is a class section of the Pile O' Fabric site that offers a gathering place for all the lectures, discussion, and students of the Pile O' Fabric classes. So far, it's been user-friendly and I was even able to link it with my Facebook account, making it even easier to share my profile picture and sign-in.

Now for the hard part: choosing my colors for this year's quilt!

Danny

Sunday, November 3, 2013

Sign-Ups are now open for Stash Bee 2014!!!

I've been a little quiet around here lately and now it's time to share why:


Sign-ups for Stash Bee 2014 have officially begun!

I am super excited to see who will join our bee and which blocks everyone will choose. Please head over to the Stash Bee Blog to poke around, and if you are interested in joining us for 2014, you may sign-up by filling out the form here.

Stash Bee 2014 is going to be a blast! Won't you join us??

Danny

Monday, October 21, 2013

Integrity and an update on my flannel quilt

I belong to an online group for modern quilters and this morning, one of the topics caught my attention. There was an issue of one quilter being untruthful about where her inspiration (and perfect copy) came from for a particular quilt she created. Bad form, not illegal. Distasteful for sure, but I don't surround myself with people who would lie about something like that. Regardless, it got me thinking... I'm not entirely sure where I stand with this concept and I wanted to reach out to you all to see what your thoughts are.

Sometimes I see something somewhere in some place that just moves me to create a quilt. Those are quilts of my own design and imagination and I love them. Sometimes I see an art print that just needs to be interpreted into textile art and I create a quilt from that (or a tote, or a pouch, you get the idea). Sometimes I just see a quilt I HAVE to have and I blatantly copy the very foundation of it, maybe making a few changes here and there, but basically copying the exact design. And I love those quilts too.

When does it become wrong?

I recently witnessed a very public online debacle regarding one quilter who created a quilt for herself based off a quilt she had seen created by someone else. The quilt was for her own home and she gave credit to her inspiration but still she suffered the wrath of the online quilting community (certainly not everyone, but a smattering). Because she posted the images of her quilt to her blog, she was seen as having stolen the design, stolen the color palette. Even though she was honest and forthcoming with her design inspiration, people still drug her through the mud and basically ruined the excitement of finishing a new quilt.

I steal ideas all the time. I see something a friend is making and think, "Man! I totally love that. I'm going to make me one." I see hand towels and pillows at Pier 1 and think, "How freaking cute is that?! I'm going to make one!" I see remodeled kitchens and handwriting samples and crafts and recipes and I steal all those ideas too, bringing their beauty into my home. And I see nothing wrong with it.

I understand the frustration an artist gets when someone else comes out with a design similar to their own. It happened to a friend of mine just a couple months back. Sometimes one person is just immoral (the copier), stealing designs and trying to get more exposure before the original designer does, making the masses think the copier is the original designer. Sometimes, two people out of the 6 billion living on the planet have the same idea at the same time, making both the original designer.

Sometimes a designer picks a design that has been out forever (or is super simple to recreate) and claims it as their own imagining. Sometimes they even get their patterns published. Kudos to them for seeing a need and meeting it. I know there are hundreds and thousands of people out there who NEED patterns to create; who can't make without being told dimensions. I'm glad there are options out there for those people. But that's not going to stop me from making a Carpenter's Star block and calling it a "Swoon", or using my Drunkard's Path templates to create a Retro Flower quilt, or from calling the off brand tissue a "Kleenex".

Modern quilting is supposed to be fun and our online community was created to give us all a place to share and encourage each other. When I finish a quilt, I'm excited! I want to share the quilt's story. I want to share my heartache, my frustrations, my process, my elation when it's complete. I want to share about the people I made it for; who they are and how every stitch was placed with the future owners in my mind. I want to hear the same from of all of you. I want to see the pictures of your daughters and granddaughters snuggling their quilts. I want to see the charity quilts you create and the stories of the people in need who made you work tirelessly to complete such a perfect and thoughtful gift. I want to see the quilts you make for yourselves. And I don't care if you didn't make up the pattern. Or the inspiration piece.

I guess what I'm saying is the community is getting less inviting and more exclusive and I don't like that. We were all beginners once. We have all been inspired by something other than our own thoughts and dreams. We all have skills and visions to bring to the table and I would hate to see anyone stifled just because they made a quilt someone else may have already made.

And please note, I'm not talking about when people take patterns created by designers and rewrite them to sell, or even people who try to sell pieces made with a pattern when they didn't get the express consent from the designer. I don't want to get into the legal-ese of all that here. I'm talking about when people make something as gifts, for themselves or people close to them.

So here is a confession: I stole the idea for the flannel plus quilt I made for my best friend's wedding. I saw Jeni of In Color Order creating a plus quilt out of Anna Maria Horner flannel (AMH is my FAVE!!) and I thought, "I just have to have that." So I bought up flannel to make one. Then my best friend saw my stockpiled flannel and asked me to make one for her too. So I did. And it turned out lovely. And I didn't use a pattern.

AMH Flannel Quilt

Now, Jeni has a pattern for that quilt which you can purchase here. I, personally, did not need a pattern for this quilt. I cut a bunch of squares, arranged them, then sewed them together. It made sense to me.

I didn't mention this in my original post about the quilt, mostly because I forgot. It's a plus quilt. Everyone is making plus quilts. But in light of recent grumblings, I thought I should mention it here and update my original post, as to not be labelled a thief or other terrible, untrue title.

My intention here is not to start a war. I just want to hear opinions from others in the community. Am I wrong?

Danny

Thursday, September 26, 2013

Cool new pattern - Owen's Olivia's Wonky Triangles

My friend Nancy of Owen's Olivia has a great eye for design. Her blog always inspires me (and mostly leaves me in awe). If you haven't seen her blog, I highly recommend checking it out. She mixes her love for sewing with her love for design and home decor, some of my very favorite things! 

About a week ago, Nancy sent me a text message with an image of this gorgeous quilt:


I just loved the colors she chose! They compliment the Tule print back marvelously. But what I loved best about this quilt was the striking, modern design. I wasn't surprised by the design. Nancy always comes up with the coolest, modern layouts. What I was surprised to find out is that she created a paper piecing pattern to sell!

Awesome, right?! The pattern is for sell at these fine, online retailers:
Craftsy and Etsy


And here are some features of the pattern I snagged from her blog:

wonky triangles paper piecing pattern
  • Great for all types of levels and comes in a 29 page PDF file.
  • Features three different sizes - small (1.75"), medium (3.5"), and large (6.5")
  • Directions on how to complete a panel as well as helpful tips, which will aid in successful completion of this project
  • 22 different templates included for versatility.
  • There are a lot of design possibilities because of the ability to customize each template, including the ability to create any size you want for your panel or block! 
  • Perfect for making zip pouches, bags, pillows, table runners, quilts, sashing, or anything else your heart desires
  • Perfectly priced at $1.99.


Such a diverse pattern! Such a great price! I just couldn't pass up sharing this with all of you, my bloggy friends. I am dreaming up projects as I write to use this pattern!


Danny

Monday, September 23, 2013

Simple Baby Quilt for Jack

My friend recently had her third little boy. Such an occasion calls for a special, quilty gift, don't you agree?

Jack Baby Quilt

Jack Baby Quilt

Danny

Tuesday, September 17, 2013

AMH Flannel Plus Quilt

This quilt finish has been a long time coming. I originally purchased this flannel fabric to make a quilt for myself but when my best friend saw it, she fell in love. I bought a bundle for her and a year and a half AFTER her wedding, I've finally finished her quilt.

AMH Flannel Quilt

AMH Flannel Quilt

Mine is a top sitting in a pile of WIPs waiting to be quilted.

Quilt specifics:
Fabric: TOP-AMH Folksy Flannel BACK-AMH Pastry Line Voile BINDING-AMH Pastry Line Voile
Quilting: Straight line, echoing three separate plus signs
Thread: Aurifil 50wt (piecing) 40wt (quilting)
Batting: Warm and Natural
Size: Queen

Inspired by Jeni from In Color Order's AMH flannel plus quilt top.

Danny

Sunday, August 18, 2013

The Ebb and Flow of Life

We all have those seasons; the ones where life riles up and forbids you from doing what you would normally do. I am in the midst of one such season but have had a heavy heart about not sharing with all of you, my lovely bloggy friends.

First off, I would like to publicly thank each any every one of you who donated to TRAC this year. I haven't received pictures or a full report, but it sounds like the girls and boys were deeply blessed by their handmade gifts provided by all of you. You have made their lives richer with just a few small items and for that I THANK YOU on behalf of them. If I get some pictures in the future, I will be sure to pass them along.

Secondly, I have been remiss in holding back on my new blog design! I kept meaning to write a whole post dedicated soley to the wonderful work of Miss Jennie over at Clover and Violet who worked with me for far too long to make some much needed changes to my design. She is absolutely amazing and deserves all the credit for my blog's look and feel. Please let her know if you are in need of a blog "facelift". She will do a fantastic job for you.

Now on to sharing just a tidbit of how time has been elapsing for me over these past few months: I am pregnant. I am having another little girl who we have named Lily and we are planning for her to arrive sometime in early January (although, if she wants to sneak in to 2013, I won't be complaining!!! Tax deduction!) My sister is also pregnant. And my best friend. And a few other friends. ((There's something in the water out here. I suggest you all keep your distance.)) But all that being said, what I really want you to know is that I am alive and living. I go out with friends. I have a group of girls I sew with on a regular basis. I have guild meetings. We have playdates. I spend lots of time with my family and can honestly say that playing pirate princess dress-up is the highlight of my day. Clara Mae just turned two years old and is just overflowing with imagination. She has recently discovered Peter Pan and truly believes she can fly! So we fly a lot. And twirl. And when we are exhausted from our travels around the kitchen island, we sit ourselves down to color or paint or mash Little People and Legos into Play-doh. I have an amazing life, but clearly, that life hasn't included blogging much lately.

It makes me sad that I don't find the time to blog. I miss you all dearly. We have really become such great friends. I could make an effort to be present in the online community through the blog, but I don't have a computer at home, just my phone. When I do have access to a computer, it's because my husband is home from work and has brought his laptop home for me to use, should I choose to, but I rarely do. The truth is I love spending time with him and spending time as a family. We talk about our days and make dinner together. We play with Maze. We walk our dogs. Sometimes we go out for ice cream. And when Clara is down for the night and we have a few moments of privacy, he reads to me while I hand sew or embroider on the couch. Yes. Our love is THAT ridiculous and perfect.

I want you all to know, though, that I have not disappeared altogether. Instagram has made it easy for me to "microblog" throughout the day, sharing projects and activities and maybe a few meals along the way. Please PLEASE consider following me there! My username is dheyen. And I have not given up blogging. I've just decided to post less often for now. I'm still waiting to see where this season leads me.

Thank you all for your continued support and friendship. It really has meant the world to me.

Danny

Tuesday, July 2, 2013

Guest Post: Travel Handmade

Hello lovlies!

Today you can find me over at Clover and Violet sharing about my travel embroider case. Go check it out!

Travel Handmade

Danny

Wednesday, May 29, 2013

I need your help

Last summer I asked for your help in making some small, handmade items for our launch of Teen Reach Adventure Camp. Camp was a huge success and the thing the girls talked about most?? The amazing, personal, handmade pillowcases and zippered pouches they each received. These tiny items meant so much more to these kids in foster care than we ever though possible, so this year, we are going to try to share that special love with the 2013 TRAC campers.


For more information, please visit my previous posts:

Background information and tutorials for drawstring bags and zipper pouches
Pillow case request and tutorials

This year we need 20 pillowcases, 11 zipper pouches, and 10 drawstring bags for the boys camp. If you could help make one or more of these items, I would be so very grateful. I need all the items shipped to me by June 30th at the very latest to give me time to make any items that do not get donated.

Please comment on this post letting me know what you are able to make and send (I am in AZ, USA) and I will update this post to let everyone know which items still need to be claimed. If you are a no-reply blogger, please also leave your email address so I can contact you.

Thank you all so much!

Pillowcases: (for girls)

1. Edy B
2. Edy B
3. Will Cook For Shoes
4. Limbania
5. Di
6. Steph
7. Gabrielle Robles
8. Ruth D
9. Ruth D
10. Ruth D
11. Ruth D
12. Ann Bixler
13. Ann Bixler
14. Tiffany
15. Tiffany
16. Jennifer
17. Jennifer
18.
19.
20.

Zipper pouches: (for girls)

1. Hadley
2. Julie
3. Julie
4. Bonnie
5. Bonnie
6. Linh
7. Linh
8. Gabrielle Robles
9. BAAMbi7
10. BAAMbi7
11. Sue
12. Sue
13. Angie Sue
14. Angie Sue
15. Tanya
16. Tiffany
17. Tiffany

Drawstring bags: (for boys)

1. Limbania
2. Jennifer
3. Ann Bixler
4. Ann Bixler
5. Ann Bixler
6. Beth
7. Jennifer
8. Jennifer
9. Jennifer
10.

Danny

Thursday, May 16, 2013

Bijoux by Bari J. Giveaway Winner

And the winner of 10 fat quarters is...

#73: Jenelle who said "Yeah I'd make a quilt too. ;) Man this is a beautiful and lush collection! I really like the mix of warm colors and different scaled prints. Your dress is just gorgeous Danny. It looks like it came straight out of one of those high-end children's boutique collections."

Congrats Jenelle! I will be sending you an email shortly!

Danny

Wednesday, May 15, 2013

Bijoux by Bari J. Launch Party and {GIVEAWAY}

Giveaway closed.

Yay! Today is my stop on the Bijoux by Bari J. Launch Party!

I met Bari at the Phoenix Modern Quilt Guild. She had cute hair and brought embroidery. No wonder we were quick friends! I saw a sneak peek of Bijoux on Hawthorne Threads' site a long while back and just KNEW I had to get my hands on some of it when it came out. I had no idea she would give me some to play with for my very own! So generous.

Bijoux was inspired by the desert; by gypsy caravans and lanterns, turquoise bracelets and long, flowing skirts. To read more about Bari's inspiration for this new, gorgeous line, check out this link.

Bari gave me some yardage of one of the butterfly prints I picked out AND a pattern to make a sweet little girl dress. My friend had been hinting for a while about wanting a handmade dress for her daughter, and this line felt just perfect for her!

Zophia Playtime Dress

Zophia Playtime Dress

Zophia Playtime Dress

I made this dress using Bari's Zophia Playtime Dress pattern. It is made to be quilter friendly with 1/4" seams and binding to finish raw edges.

Zophia Playtime Dress

The back of the dress has an elastic casing. No buttons or zippers!

Zophia Playtime Dress

Zophia Playtime Dress

This fabric is vibrant and rich. Exactly the colors and hues I love! Plus, Art Gallery Fabrics are silky soft making them ideal for garments.

I also made a grocery bag holder for my mom out of one of my favorite prints in the collection:

Mine is the ugly one and my mommy gets the cute #bijouxbybarij one. I think I should make another. @barij

You get my fancy cell phone picture because she snatched it up before I could properly photograph it, but you get the idea. I've been thinking about buying more of this print to decoupage onto wood, making a spool holder for my craft room wall. I've been needing one and this print has just the right amount of bright, bold and freaking amazing that I've been looking for.

I've also been planning a quilt.

Adding color to #bijoux. @barij

I knew immediately I had to make a medallion quilt with this line. I free motion embroidered an image of my interpretation of Bijoux and added some hand embroidered touches to make her come to life. She is going to be the center of my Bijoux medallion quilt, which I will share once I complete it.

Quilt planning and tea drinking.

So now that you've seen all the beautiful things I've made, you should take a look at what some of the other Launch Party-ers have made/are going to make:

May 8: Melanie Dramatic
May 9: Sew Much Like Mom
May 10: 100 Billion Stars
May 11: I'm Doing Stuff
(mother's day, no stop on the 12th)
May 13: Imagine Gnats
May 14: Jona G.
May 15: Mommy for Reals
May 16: Olive and Ollie
May 17: Pile O' Fabric
May 18: Sally's Angel Works
May 19: JM Maxman

Bijoux has now shipped to stores, but if you would like to join, I have a 10 fat quarter bundle to give away to one lucky commenter!


How To Enter

This giveaway is open to everyone. If you are a no-reply commenter, please include your email address in your comment. The winner will be chosen randomly and I will need to be able to notify the winner via email.

Leave a comment letting me know what you would like to make with Bijoux. That's it! This is a quicky giveaway that will close 12am Arizona time TONIGHT (15 May 2013)!!! Tell your friends and have them enter here too. You don't want to miss out on this awesome collection!!

Giveaway closed.

Also, don't forget to check out the Flickr group to see what other people are making with Bijoux.

Danny

Tuesday, April 30, 2013

Thoughts on Tastebook?

I have a huge collection of recipes I love that I have been collecting and archiving in a binder I keep in the pantry of my kitchen. This works well for me because it gets my computers away from the kitchen (I get lots of recipes from Pinterest!) and because I store them in clear, plastic report covers, it keeps the recipes clean of cooking spatter.


My family has a collective Tastebook.com account. Basically, it's an online database that allows you to store, sort and share your recipes online. I absolutely love having all the family recipes in one place and it has made it easy to just pop into the account to copy/paste a recipe into an email for a friend.

I use far more recipes than can be housed on this little blog. Every so often I try to share one with you all, but the truth is, I could have this blog just be a food blog and probably have a new recipe every couple of days without duplicates. I really love to cook (and eat!) but I can't just bombard you all with food posts everyday for the next year just so I can get them all on my blog, so here's my thought: I could create a personal Tastebook.com account and post my library of recipes there.

The only problem with Tastebook.com is you must also have a Tastebook.com account in order to see my recipes. We become friends, a la Facebook, and then we can share our recipes with each other. So my question is this:

Would you do that?

Danny

Tuesday, April 23, 2013

Oatmeal Molasses Bread

It's been a lifetime since I've posted any recipes on the blog! The truth is, I have terrible lighting in my kitchen and I don't know how to take nice pictures without natural light. Winter means it's dark by the time dinner is ready to be photographed, therefore, no recipes in the winter. Now that the sun is staying out a bit later, I can finally start sharing with you some of the yummy things I whip up for my family.

Today, I am starting with one of my favorite breads, Oatmeal Molasses. I make my breads by hand, so I will share with you the hand kneading directions.

Oatmeal Molasses Bread

Ingredients:

2 1/3 cups (19 fl oz/580 ml) water
1 cup (3 oz/90 g) old-fashioned rolled oats, plus some extra for topping the loaves
1/2 cup (4 oz/125 g) unsalted butter
1/3 cup (3 1/2 oz/105 g) unsulfured molasses
2 packages (5 teaspoons) active dry yeast (You can also use Bread Machine Yeast)
5-6 cups (25-30 oz/780-940 g) all-purpose (plain) flour, plus extra for kneading
2 teaspoons sea salt

Recipe:

In a small saucepan, bring the water to a boil. Put the oats into a heatproof bowl, and pour the water over the oats. Add the butter and molasses, and let the mixture cool to warm (105-115F/40-46C).

In a large bowl, dissolve the yeast in the warm oat mixture and let stand for 5 minutes. Using a wooden spoon, stir in 3 cups (15 oz/470 g) of the flour and the salt, mixing well. Add the remaining 2-3 cups (10-15 oz/315-470 g) flour as needed to make a soft dough. Using a plastic pastry scraper, scrape the dough out of the bowl onto a floured work surface. Knead until it is smooth and elastic, dusting flour to keep the dough from sticking, 5-7 minutes.

Form the dough into a ball and transfer it to a lightly oiled bowl. Cover the bowl with plastic wrap and let the dough rise in a warm, draft-free spot until it doubles in bulk, about 1 hour. (I place mine on top of my fridge.)

Butter two 9-by-5-inch (23-by-13-cm) loaf pans. Punch down the dough and, using the pastry scraper, scrape it out onto a clean work surface. Cut it in half with a sharp knife or a bench scraper.

For each half, evenly flatten the dough with the heel of your hand. Roll the top third down onto itself and seal it by pushing it gently with the heel of your hand. Continue rolling and sealing the dough until you have an oval log. Place the loaf, seam side down, in the prepared loaf pans. Press on them to flatten them evenly into the pans. Cover loosely with a kitchen towel and let them rise in a warm, draft-free spot until they double in size, 45-60 minutes.

Position a rack in the middle of the oven, and preheat to 375F (190C). Mist the tops of the loaves with water. Sprinkle the tops with a generous handful of oats. (I have gotten to the point where I skip this step because it's just messy and doesn't add to the flavor of the bread.) Bake until they are golden brown and sound hollow when tapped on top, 40-45 minutes. Carefully remove the loaves from the pans and let cool completely on wire racks before slicing.

I got this recipe from a book I borrowed from a friend. It is absolutely amazing and I want to buy it for myself. Not only are the recipes tasty, the pictures are delicious in themselves!

Essentials of Baking: Recipes and Techniques for Successful Home Baking. Williams Sonoma.
ISBN: 0-8487-2779-7
Here is a link to purchase the book on Amazon.

Oatmeal Molasses Bread

Oatmeal Molasses Bread

Making bread is relaxing for me. I relish in the fact that I cannot do anything else with my time while I'm kneading a new dough. I am a busy person, constantly multitasking and filling every moment with as much as I possibly can. Making bread for my family gives me time to slow down and just... be, if only for a few minutes. Knowing our bread is made with healthy ingredients is just an added bonus. This recipe makes two loaves, which we go through in about two to three weeks. Sometimes I find myself giving away loaves just so I can make more! It's healthy to have stress relievers, and this is mine.

If you have a yummy bread recipe you would like to share, I would love to try it! I have been trying to branch out a bit but I'm having a rough time finding recipes that a) can be made without a bread machine or standing mixer, or b) actually have a review to let me know whether they are good or not!

Danny

Thursday, April 18, 2013

Bubble Party

I like to do fun things with Clara and I've decided to invite other kids over to play along with us. It started with a Valentine's Day Party where we made Valentine's for daddies. I was busy playing hostess and forgot to take pictures at that one, but this time I was ready!

To celebrate the first day of Spring (and our amazing weather lately) I threw a Bubble Party. It was scheduled over Spring Break. I thought that meant more people could attend, but as it turns out, it means more people are out of town! Who knew? Anyway, it was a small gathering, but lots of fun for the kiddos, and the mamas, who got to have some real, adult conversations.

One of the lovely mamas who attended is a photographer who, lucky for me, wanted decent pictures of the party! Here are some of her shots:

Bubble Party

Bubble Party

Isn't Val BEAUTIFUL?!

Bubble Party

Bubble Party

Bubble Party

Bubble Party

Bubble Party

Bubble Party

Bubble Party

Bubble Party

Bubble Party

Bubble Party

I will be planning more play dates, especially as summer hits and we can no longer be outside with the kids. I'll be sure to share what we do. I know I am inspired by other blogs and what those mamas do with their children!

Danny
Related Posts Plugin